Perfect Pumpkin Fudge: Avoid Common Mistakes for Silky Smooth Results
Nothing captures the essence of autumn quite like the rich, warm flavors of pumpkin. As leaves turn brilliant hues and a crisp chill fills the air, our thoughts often drift to cozy treats that evoke nostalgia and comfort. Among these, homemade pumpkin fudge stands out as a true seasonal delight. Imagine biting into a square of velvety smooth confection, bursting with real pumpkin, fragrant spices, and a hint of sweet white chocolate. It's the taste of fall in every melt-in-your-mouth bite, a sweet escape that warms the soul.
Yet, for many home bakers, achieving that elusive, perfectly silky smooth texture in homemade pumpkin fudge can feel like a culinary challenge. We’ve all been there: a batch that turns out disappointingly grainy, too soft, or too hard. The good news? Crafting exquisite pumpkin fudge isn't about magic or secret ingredients; it's about understanding a few fundamental principles and sidestepping common pitfalls. In this comprehensive guide, we'll walk you through the journey to flawless homemade pumpkin fudge, ensuring your autumn treats are nothing short of spectacular.
The Foundation of Flavor: Choosing Your Pumpkin Puree Wisely
The journey to truly sublime
homemade pumpkin fudge often begins before you even turn on the stove, with the simplest yet most critical ingredient: pumpkin puree. This seemingly straightforward choice is, in fact, one of the biggest determinants of your fudge's success, and a common source of frustration for many.
The golden rule here is absolute: *always use plain pumpkin puree, not pumpkin pie filling*. This distinction might seem minor, but it's monumental in the world of fudge. Pumpkin pie filling is a pre-mixed product, already seasoned with spices like cinnamon, nutmeg, and ginger, and significantly sweetened. Introducing these pre-added elements into your fudge recipe will throw off the delicate balance of flavors and, crucially, alter the sugar content and moisture levels, leading to a fudge that is either cloyingly sweet, strangely spiced, or simply refuses to set correctly.
Plain pumpkin puree, on the other hand, is just that: pure, unadulterated pumpkin. This allows you to control the exact amount of sugar and the precise blend of warm, autumnal spices like cinnamon, nutmeg, and pumpkin pie spice that will infuse your fudge. This control is vital for achieving that perfect, nuanced flavor profile that screams "fall."
While canned pumpkin puree is widely available and incredibly convenient, offering consistent texture and moisture levels, some home cooks prefer to make their own. If you opt for homemade pumpkin puree by roasting and pureeing fresh pumpkin, ensure your puree is thick and not watery. Excess moisture is the enemy of fudge setting properly, so if your homemade puree seems a bit loose, gently simmer it down in a saucepan to reduce the liquid content before incorporating it into your fudge mixture.
Interestingly, most pumpkin fudge recipes call for only about half a cup of pumpkin puree, leaving you with plenty of leftover puree to whip up other autumnal delights like muffins, lattes, or even savory dishes. This means that humble can of puree in your pantry is a true workhorse, ready for multiple culinary adventures.
Mastering the Heat: The Critical Role of Your Candy Thermometer
For many aspiring bakers, the journey to perfect
easy pumpkin fudge hits a snag right here: temperature control. Fudge making is less about intuition and more about precision, and a reliable candy thermometer is your absolute best friend in this endeavor. Without it, you're essentially flying blind, risking a batch that's either too soft to hold its shape or so hard and grainy it crumbles.
The sweet spot for pumpkin fudge is typically the "soft ball stage," which occurs between 234°F and 238°F (112°C to 114°C). Cooking the sugar mixture to this exact temperature is crucial for the sugar crystals to form correctly later, resulting in that dreamy, creamy texture. If your fudge doesn't reach this temperature, the sugar solution remains too dilute, and the fudge won't set firmly enough. Conversely, if it cooks too high, the fudge will become hard, brittle, and likely grainy due to oversized sugar crystals.
One of the most common mistakes, as many seasoned bakers can attest, is relying on an inaccurate candy thermometer. Even a deviation of a mere 5-10 degrees can spell disaster for your fudge. It’s a good practice to calibrate your candy thermometer regularly. You can do this by placing it in a pot of vigorously boiling water; it should read 212°F (100°C) at sea level. If it reads higher or lower, you'll need to adjust your target fudge temperature accordingly, or better yet, invest in a new, reliable thermometer. When using the thermometer, ensure the tip is submerged in the fudge mixture but not touching the bottom of the pot, as this can give a false reading.
Cooking the mixture slowly and steadily, allowing the sugar to fully dissolve before it reaches a rolling boil, also contributes to a smoother final product. Patience here pays off, laying the groundwork for a truly professional-quality
homemade pumpkin fudge. For a fuss-free approach that delivers consistent results, our
Quick & Creamy Pumpkin Fudge: Your Easy 20-Minute Fall Treat article offers excellent guidance on speedy preparation.
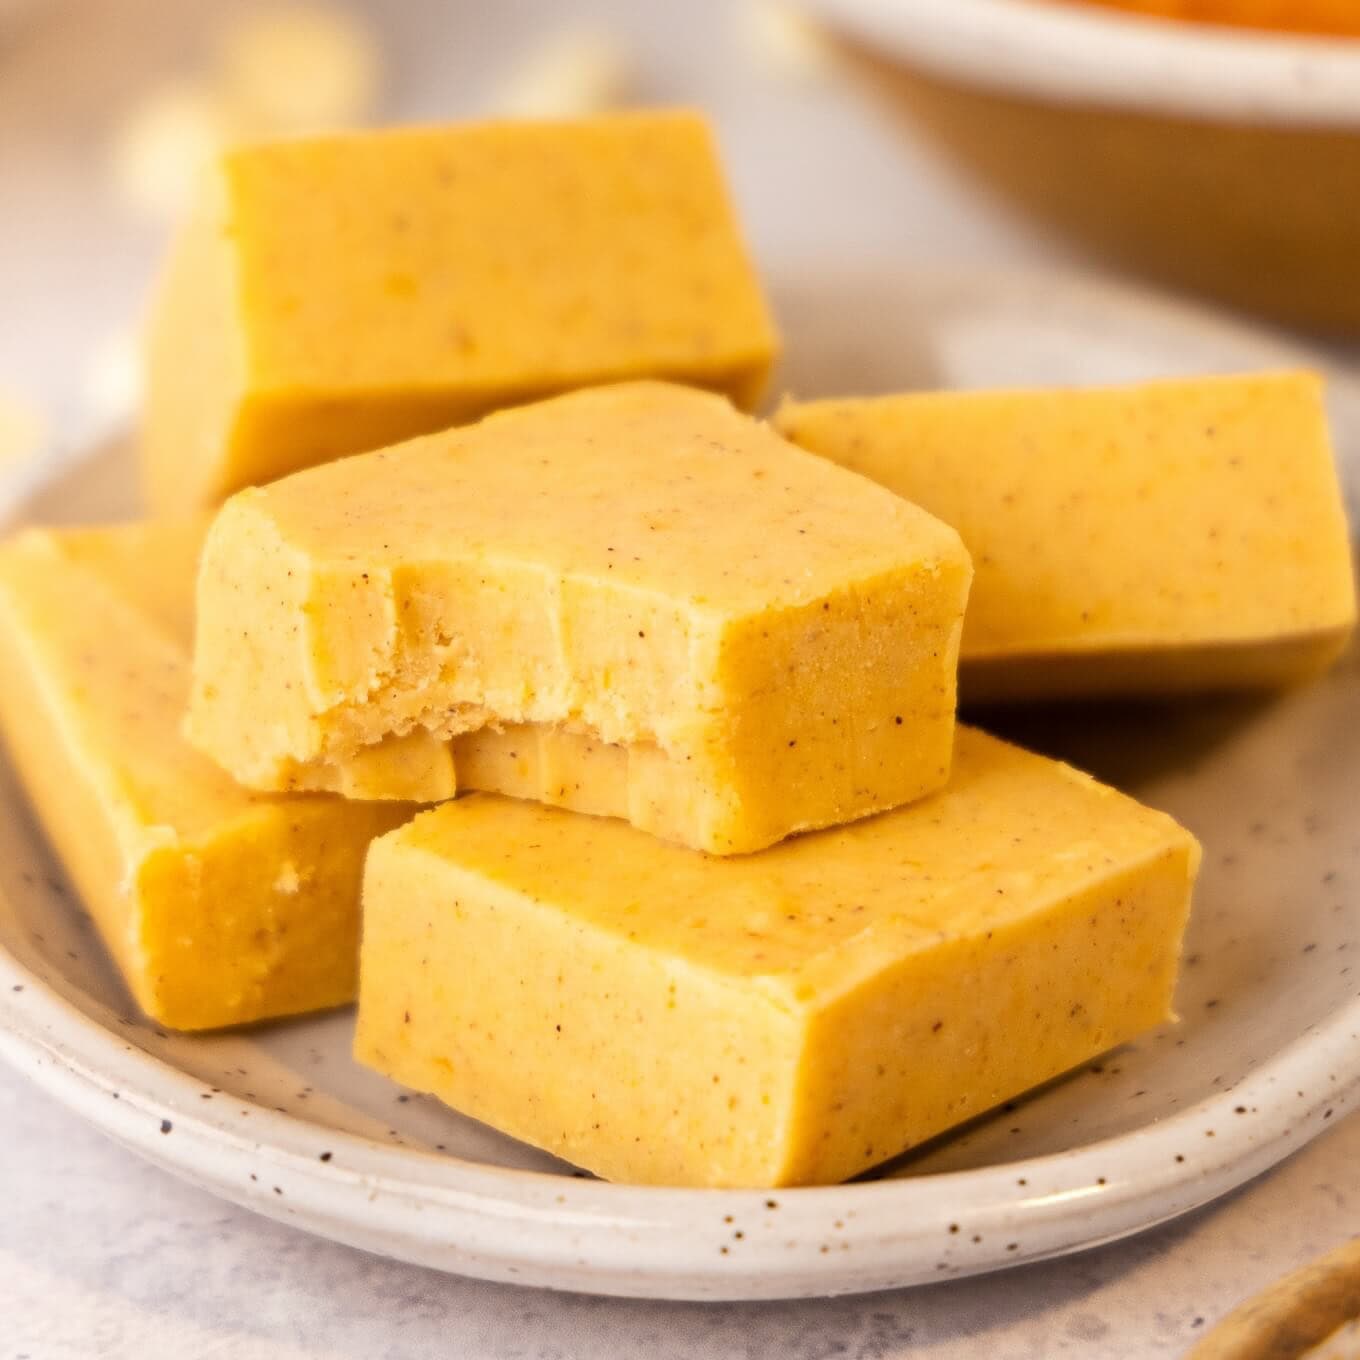
The Science of Smoothness: Avoiding Grainy Fudge
Achieving that coveted silky texture in your
homemade pumpkin fudge isn't just about temperature; it's also about managing sugar crystals. This is where two critical mistakes often lead to a grainy, crumbly texture instead of the smooth, luscious squares you envision.
First, resist the irresistible urge to stir the fudge mixture once it begins to boil. Stirring during the cooking process can encourage sugar crystals on the sides of the pot to fall back into the boiling mixture, acting as "seeds" for premature crystallization. These tiny crystals then multiply rapidly, leading to a grainy texture. Instead, once the mixture comes to a boil, let it cook undisturbed. If you notice any sugar crystals forming on the sides of the pot, gently wipe them down with a wet pastry brush. This dissolves the errant crystals, preventing them from contaminating your smooth fudge. Using a heavy-bottomed pot also helps, as it distributes heat more evenly and reduces the likelihood of scorching and crystallization on the bottom.
The second crucial step often overlooked is proper cooling before beating. Once your pumpkin fudge mixture has reached its target temperature (234-238°F), immediately remove it from the heat. Do not touch it, do not stir it, and do not even look at it too hard! Let it cool undisturbed to a specific temperature, typically around 110°F (43°C). This slow cooling process allows the sugar crystals to form gradually and uniformly in a supersaturated solution, preventing the formation of large, coarse crystals. If you beat the fudge while it's too hot, the sugar crystals will form too quickly and haphazardly, resulting in a grainy texture. If it cools too much, it will harden prematurely and be difficult to beat into a smooth consistency.
Once it reaches that 110°F mark, it's time for the final act: beating. Vigorously beat the fudge mixture with a wooden spoon or an electric mixer until it thickens, loses its glossy sheen, and starts to pull away from the sides of the bowl. This beating process encourages the formation of numerous tiny sugar crystals, which is what gives fudge its characteristic smooth, creamy texture. Stop beating as soon as it reaches this stage, then quickly pour it into your prepared pan.
Beyond the Basics: Expert Tips for Pumpkin Fudge Perfection
While mastering the puree choice, temperature, and beating technique are foundational, a few extra tips can elevate your
homemade pumpkin fudge from good to absolutely extraordinary.
1. **Prepare Your Pan:** Always line your baking pan with parchment paper, leaving an overhang on the sides. This creates "handles" that make lifting the set fudge out of the pan incredibly easy, allowing for clean cuts without damaging the perfect squares. Lightly grease the parchment paper for extra insurance against sticking.
2. **Quality Ingredients Matter:** Beyond the pumpkin puree, the quality of your other ingredients plays a role. Use good quality white chocolate (if your recipe calls for it) and fresh, aromatic spices. Stale spices will result in dull-flavored fudge. A tiny pinch of salt can also dramatically enhance the overall flavor, balancing the sweetness and bringing out the warm notes of pumpkin and spice.
3. **Flavor Boosters:** Don't hesitate to experiment with additional fall-inspired elements. Adding cinnamon baking chips (as some recipes suggest) can provide delightful bursts of spiced sweetness. A splash of vanilla extract added *after* the cooking process (never during, as it can evaporate) further deepens the flavor profile. Consider a tiny dash of finely grated orange zest for a bright, unexpected lift.
4. **Patience is a Virtue:** Once your fudge is poured into the prepared pan, resist the urge to cut into it immediately. Allow it to set completely, ideally in the refrigerator for at least 2-4 hours, or even overnight. This crucial chilling time allows the fudge to firm up properly, ensuring clean, perfect squares. For those who appreciate the true essence of autumn, learning how to make
Homemade Pumpkin Fudge: Get That Old-Fashioned Taste with Real Puree is a must, and patience is key to its success.
5. **Clean Cuts:** When it's time to slice your fudge, use a large, sharp knife. For the neatest squares, run your knife under hot water, wipe it dry, and then make a cut. Repeat this process for each cut, reheating the knife as needed. This helps prevent sticking and ensures smooth, attractive edges.
6. **Storage:** Store your delicious homemade pumpkin fudge in an airtight container at room temperature for up to a week, or in the refrigerator for up to two weeks. It also freezes beautifully for several months, making it an excellent candidate for holiday gifting or future fall cravings.
With these insights and practical tips, you're now equipped to tackle the art of pumpkin fudge making with confidence. By avoiding common mistakes and embracing precision in your process, you’re not just making a dessert; you’re crafting a little piece of autumn magic. So, gather your ingredients, trust your candy thermometer, and prepare to indulge in the silkiest, most flavorful
homemade pumpkin fudge you’ve ever tasted. Your kitchen will smell incredible, and your taste buds will thank you for this truly seasonal treat.